Showing posts with label panorama. Show all posts

Thursday, April 26, 2012

Are there any open source programs that can use RAW for stitching photos?

Question

I want to stitch lots of photos together since getting my Sigma 10-20mm. I've got a couple of projects in my head I want to do as well. However, my experience using Hugin for stitching hasn't been wonderful (I'm probably just bad at using it) and RAW is far nicer to edit in. It's been particularly annoying to move out of lightroom, convert everything into TIFF and hope that it looks ok.

Additionally are there any better recommendations people could give me on stitching software in general (doesn't have to be open source)? I'm aware that photoshop 3 has a stitcher but I'm still used to using lightroom.

Thanks!

Answer

There's unlikely going to be anything that takes several RAW photos, stitches them together, and then produces a RAW pano, which is what it sounds like you're after. The Photoshop + LR (and other pano software that take RAW as an input) combo makes it seem like it may because it loads up your RAWs to use, but its still TIFF converting and you still end up with TIFF.

RAW isn't really a file format like you're thinking. Its a collection of raw sensor data in a container. By nature, running it through the pano process will make it not RAW.

Use Lightroom to exposure balance your pano individual shots first, and then try Hugin with the TIFFs. Personally, I've had reasonable success trying that lately.

Answered by rfusca

Tuesday, February 14, 2012

Equalize exposure levels of a set of images in a stitched panorama

Question

I've taken a set of pictures for a panorama. Unfortunately, I've forgotten to set the flash to manual exposure, hence I ended up with uneven exposure levels in the images.

When I stitch them together, the result looks like this:

enter image description here

Next, I've tried to use Lightroom 3 to adjust the exposure levels manually so that they match more closely, using the histogram as a guide. That did work somewhat, but still wasn't perfect: LR only lets me change the exposure in 1/3 EV steps, but I felt I needed finer control.

When I stitched the adjusted imgs with Hugin, it evened out the levels somewhat. See the result:

enter image description here

As you can see, this didn't work well, either: The image is brighter in the top center, growing darker towards the edges. Hugin's automatic exposure adjustment only seems to have applied the adjustments locally between neighboring imgs, dealing with the unevenly exposed tiles. However, it didn't succeed in evening out the brightness on a global level for all images.

How can I get this right?

I have CS4, LR 3, Aperture, Hugin.

Maybe I could edit the resulting gigapixel image with PS, adjusting the brightness regionally (i.e. brighten the borders more than the center). I believe I need to use a radial gradient mask, but I#ve not figured out yet how to get a gradient that's going only from light grey to white instead of black to white.

However, I'd prefer a solution that would help me align the exposure of the original imgs instead of trying to fix the stitched result.

An idea: Is there a way to see the histograms of all images in a set at the same time? LR seems to let me see the histogram only for one (selected) img at a time. Seeing all histograms in comparison at once would probably help me seeing which ones are out of line.

Answer

Looking at the last result, I think that's as good as you'll get modifying each set, so I would do as you suggest and use a radial gradient.

To select grey to white, rather than black to white, set your foreground/background colors to grey and white before selecting the gradient tool.

Or you can use black/white, set blending mode to overlay and use layer opacity to fade the effect.

Another possibility is to create a solid black layer in overlay blend mode. Create a new mask, select the mask, then do Image > Apply Image. This will create a mask which matches the overall luminosity of the image. That means lighter areas will be lighter in your mask, and should allow the black overlay layer through, which will darken those light areas.

Answered by MikeW

Tuesday, January 17, 2012

How can I get better results photographing dry erase boards?

Question

As far as photography goes, I'm less than an amateur. I have a camera my friend (the head of the photography dept. at a local college) recommended to me that I really want to learn to use, but haven't had time (Nikon D90 - a gift from a relative). I used to do a little more work years ago with film, but I've forgotten more than I remember.

I'm a writer and when I'm working on a story, I use white dry erase boards of different sizes (from about 9x11 inches up to about 2'x3', but one or two are a little larger than that). This works fantastically well for me when I'm diagramming plots or doing scatter notes, before I sit down and do the writing. With the dry erase boards, it's easy to change things around by just wiping a section out and restarting.

I'd really like to be able to take pictures of these whiteboards and save the image when I'm done (and perhaps, later, print it out).

The problem is, with the larger boards, if I'm back far enough to get a photo that fits all of it into the frame, it's too hard to read what I've written on it. (Also, the surfaces are reflective.) I've been told there is software I can use so I could take a number of photos of sections of one board and have the software put them together in one big image. I don't know how well that works (and I don't know what that process is called), so I'm worried about the cost of the software as well as being able to keep the scale the same from shot to shot.

I don't mind building something to do this if it's not something huge, or if I can set it up quickly once I'm done. I just don't want to have to worry about lots of details when I'm in "work mode."

Is there a fairly simple way I can use my camera to take images of these boards that include the whole board and still let me see enough detail so I can read what I've written on them?

Answer

I think you want simple, so I'd recommend using Program mode, which gives you the greatest control without making you learn about exposure. Program mode (the 'P' on the Auto-P-S-A-M dial) gives you these advantages:

  • it sets exposure correctly for the lighting conditions, so you won't get a too-dark or too-light image, and you don't have to think about shutter speeds or aperture values or what they mean.
  • it won't try to raise the flash, which would reflect off the whiteboard
  • you can set exposure compensation, which helps if the camera isn't guessing the exposure correctly.
  • you can set the ISO.
  • you can set the white balance.
  • if you really want to, you can change the shutter speed / aperture combination that your camera chose. For your particular use case, you want to spin the dial all the way to the right (I think) to get the fastest shutter speed.

So, with all that, I'd follow this checklist:

  • set your image quality to the highest possible. Don't use RAW.
  • set into Program mode.
  • unless you're using a very small whiteboard or can't get closer to it, zoom all the way out (to give the camera the widest range of apertures to choose from).
  • set the ISO to 100.
  • set exposure compensation to 0.
  • set white balance to Auto.
  • take a sample picture (aim the camera, fill the viewfinder with the whiteboard, half-press the button so it will auto-focus, then while calmly breathing out, slowly and steadily press the rest of the way down).

Now look at the results. Apply any of the following corrections, as needed, and take another sample picture:

  • Zoom in to a sample of the text: if the picture is too blurry, raise the ISO and try to hold the camera steadier.
  • If the picture is too dark, increase exposure compensation (+1). If the picture is too light, decrease exposure compensation (-1).
  • If the colors don't look right, change the white balance. I know very little about white balance, so you'll have to get someone else to help with this.

When the "sample picture" doesn't have any problems, promote it to "finished picture" and you're done.

Tuesday, January 3, 2012

HDR then Panorama, or Panorama then HDR?

Question

When creating a panorama for a scene of huge dynamic range, intuitively I always merge exposure brackets to HDR and tone-map them and then stitch the resulting images into a panorama. My intuition here is that the HDR process is much more predictable than the stitching process, so I start with the former. I realize this may be because I know a lot about HDR (worked on HDR S/W for 9 years) and little about stitching software.

Is this the right order to do this and why?

This question came up because in the book Mastering Panorama Photography the author stitches first and then merges the LDR panoramas into a HDR one. He mentions this but does not explain why.

Answer

Doing HDR first has advantages: the HDR process is working on a smaller image size, and you only have to stitch one set of images.

But the disadvantage of doing the HDR step first is it becomes more difficult to exactly match the tones between sets of images, so when you stitch them together you get more obvious seams. If you are able to control this and don't have this problem, then I could see it being easier to do HDR first. But for most people they will have ended up with slightly different HDR adjustments done and they will have seams to deal with.

Edit: I have recently found that doing the pano stitching step first, sometimes the resulting files have slightly different dimensions, off by a pixel or two, and then the HDR processor complains that the images must be the same dimension.

Saturday, December 24, 2011

Choosing Nikkor Lens For Panoramic Photography?

Question

I want to buy a wide or fisheye lens for taking panoramic (360°) photos. My camera is the Nikon D7000 . I am a little bit confused about FX and DX lenses; could you guide me to select the correct lens?

Answer

I agree that a wide angle lens gives too much distortion to allow auto-stitching software to function correctly.

The 50mm Nikkor 1.8 might be a good choice, but bear in mind that 50mm on a Nikon cropped sensor is 75mm. This might make it a bit too zoomed in for your liking. It really depends on your subject matter. If it fits, the 50mm is a great lens. It's extremely sharp for the money. And can be used for great portrait shots too.

If the 50mm's no good, Nikon do a 35mm 1.8 that might fit better.

Tuesday, December 20, 2011

What is a good 360 degree camera?

Question

I want to buy a new camera for a 360 degree shoot , so can anyone suggest me the good one

I have seen that Sony Bloggie camera which has 3D camera and a 360 degree lens too, so does this camera have good quality to take 360 photos?

Link to Sony Bloggie Camera

Answer

From what I have read, the Sony Bloggie has quite poor quality and is pretty limited as far as what you can do for 360 degree photography. It is more of a market gimmick then a full fledged option. The camera only starts with a 5MP sensor, and stretching that out over a very small sensor, and a very very large aspect, you can only imagine that it isn't setup for serious use.

Some opinions from reviews:

  • The 360 degree attachment is great as a novelty item but you won't want to take serious video with it(link).
  • While 360 degree mode is more a toy than premium class, you get good casual takes. Funny mode to play with. (link).

You might want to take a look at pano-pro if you want to get into this field.

I found a pano photography forum that has greater expert advice on using this camera in the real world here: Link

Tuesday, December 13, 2011

What is the proper exif tag to mark a lens as a fisheye?

Question

I'm shooting panoramas with a manual 8mm fisheye lens on my Canon 60D DSLR (APS-C, 1.6x crop factor).

Since the camera cannot talk to the lens, the exif data in the pictures is all wrong. I know how to fix the focal length using ExifTool, but I'm having trouble locating the proper tag to indicate that the lens is a fisheye.

Does anybody know which tag is used to indicate the lens type?

Answer

I don't believe there is an "official" EXIF tag for lens type. As much as I know about EXIF (which admittedly isn't a ton), I believe Lens Type is a "maker note", or additional OEM-specific settings. I believe you can simply add a LensType tag and stuff the name of the lens in that tag. Most tools should recognize that.

Friday, December 9, 2011

What software do I need to create a panorama inside a cylinder to publish on the web?

Question

Googling I found on the net reference to sphere panoramas, but I'm not interested in looking up or down, just to the front. My image is a just rectangular, a very wide panorama and I wanted to create a view of it, as if one is inside a cylinder and the inside walls have the texture applied to it. If possible I wanted to publish it to the web.

Answer

Found a way to it with WebGL library threejs, demo here: http://nunocruz.me/panorama/ Feel free to view the source code of the page and use it if you want to do the same and if you have any questions about it just ask!

Thursday, December 8, 2011

Where can I print a panorama?

Question

You scout the location, bring your tripod with you, wait for the right light, become victim of weather in the meanwhile, take an insane amount of photos, work hours on getting the stitch right, and only then you decide you are satisfied with those 20 million pixels.

But.

I'd also like to get those pixels out, on the paper and on a wall, where they belong. Where can I print such a thing (online)? Quality is a must. Bonus points if the answer is Europe-friendly.

Edit:

I volountarily left out many details to have more general answer, but on a second thought they might turn out useful.

Sizes: at least 1 meter on the longest side
Ratios: let's say from 2:1 to 5:1, but I can tolerate to resize and have some border to cut out.
Materials/finish: anything worth hanging in your house.

Answer

Let me advocate for offline printing for a second :) I used to print online, but I rely on a local print shop nowadays. I'm not talking CVS or Walmart (in the US), but small, quality print shops run by photographers. Not only is it good for the local economy, but you won't beat that kind of interaction. Print professionals are passionate about what they do, and will often give you good advices or guide through the process of large prints.

With that in mind, I would suggest you look around in your town, or a nearby town, and see what it has to offer. A local store doesn't mean you have to always drive there actually, they may have a web site for you to upload your photos. Check what kind of printer they use. I recently had this 9K x 3K panorama printed at 36" x 12" on a ZBE Chromira digital LED printer, and you can go larger/better on a Giclée printer. You will pay a price for that, but this will be quality work (not $5).

Tuesday, November 1, 2011

What is the correct way of shooting a panoramic shot?

Question

I just bought a tripod and I'm starting to learn photography. I own a Canon T2i (kit lens) and I'm interesting in taking panoramic shots.

What are the pro tips for doing this?

I'm trying to set my camera with narrow aperture and sometimes a slower speed.

I'm missing some contrast and color in both pics.

Here are two examples:

http://fav.me/d4e8qi9

http://fav.me/d4d3qpz

Answer

The key to shooting images for a panorama is to get as much consistency as you can. Since you have a DSLR, this blog post should help you or read my panorama tutorial.

It is OK if everything is not perfect but the more you do the better the chances of your software being able to stitch resulting images. At the very least you should keep the focal-length (zoom), focus and aperture constant.

The most PRO tip would be to use a specialized panoramic head. They cost a good amount of money but ensure consistency between viewpoint which makes things much easier to stitch.

EDIT:

Panoramic heads come in two types. Either flexible which you can adjust (actually, you have to) to almost any combination of camera and lens, for example the Manfrotto 303 or WTVR Spherical Pro. Or as fixed heads designed for a single combination of camera and lens which are available for common combinations, for example the 360Precision Absolute MK2.

Monday, October 17, 2011

I need some free panorama stitching software

Question

I have iPad and a Mac. The software could be for either, but I really need it to be free or very cheap. Trial versions are acceptable, as long as they leave no watermark. Any recommendations?

Answer

Hugin is the standard answer here.
I've used it very successfully on Windows, but there is a Mac download available on the download page on the website.
As I understand it, Hugin's not as easy to use as some of the paid-for competition (none of which I've tried), but it's worth persevering with.

Sunday, September 18, 2011

Why is Photoshop not merging my panorama?

Question

It's not something i am planning on doing often but I wanted to try to do a panorama and use Photoshop's "Merge to Panorama" feature to stitch the images. Previously I have only done this manually. I think I have a decent overlap in my images but Photoshop is unable to stitch my images. I have 2 sets of images and it stitches the middle group fine but not the first and the last image. This is similar with my other group of images where it stitches 2 middle groups and not the first and the last image. Below is a screen capture of what i usually get:

What am I doing wrong?

enter image description here

Answer

The framing of the first and last images seems to be significantly different from the others (it took a while for me to see that the top pic was the last and the bottom the first, assuming left-to-right sequence). There may simply be too much ambiguity for Photoshop to deal with in this particular sequence, since the main differentiator is colour (something PS autocorrects to a degree in stitching), with the darkness of the islands and clouds being the "anchor", and both of the pics left out have the horizon in a significantly different place than their next-door neighbors.

I don't know how the panoramic merge works in PS these days (I'm still running CS3), but this looks to me like one of those instances where manual tiling would be necessary, and I'd expect to lose (or have to synthesize) a significant part of the vertical after the stitching because of the framing issue.

Thursday, August 11, 2011

How does Gigapan Handle Movement?

Question

Exploring the Gigapan website, I found amazing panoramas assembled from hundreds or thousands of images that include large crowds.

How does the Gigapan automated panorama device handle movements in the scene?

How well did it work in general?

Answer

Sorry guys, it's all manual masking out unwanted movement and "ghosts" shot by shot.

Sunday, July 31, 2011

How does “sweep panorama” compare to traditional montage?

Question

Newer Sony cameras offer "sweep panorama" mode where you just pan the camera and it stitches the panorama picture in the camera. This function is starting to appear in models from other manufacturers too (can't find the relevant link at the moment).

Apart from the obvious limitation to one picture height/width (one cannot create 2xN or Nx2 panorama in this mode) - can anybody tell how sweep panoramas compare to traditional panorama montage? Is the result comparable/better/much worse?

Answer

I tried a model like this in the store, both horizontally and vertically. I was not satisfied with the quality. The particular model that I tried used seemed to be using the HD video imaging pipeline to do its stuff. Also, when used vertically, it required you to change the orientation of the camera by 90deg. In the end, the small dimension on the pano was always 1080. You can do way better than that with stitching with a hand held p&s that has man exp and focus.

So my advice is try before you buy.

Monday, July 18, 2011

Can I make a panorama mount for occasional panorama shooting?

Question

I sometimes (about 5 times per year) decide to shoot a panorama, just for me, with no intentions to sell or use the photo outside my family and close relatives.

Currently I use my Pentax DAL 18-55 lens and free Hugin software for it but I plan to buy Samyang 8 mm fisheye. I made few panoramas using my monopod (better than to shoot "from hand"). However I read something about things like nodal point etc. and found out that the head mount should be located not on the bottom of the body but near the rear lens element.

I know of things like Nodal Ninja etc., but it is too expensive and I do not plan to shoot panoramas often. When I would stick with my monopod and lets say with the Samyang fisheye, than some simple small and light aluminum profile with two holes, tripod nut and screw would make it possible to mount the camera and rotate it around nodal point - is it right? Does it make sense to build such gadget or do you think I will have similar results using standard mount?

Answer

Yes, you can do it. I know some people that have, one friend made one out of wood because it was easier than metal. If you intend to do it for your 8mm, it will be relatively easy since there is ONE fixed nodal point, contrarily to the zoom.

You said you do not do panoramas often but do you do Macro? If so, a macro rail is sufficient to work for a DSLR with a short lens and it will work for the 8mm and your zoom at all focal-lengths.

Included in my How To Make a Panorama tutorial are instructions with an example on how to find the nodal point (technically entrance pupil).

Sunday, July 17, 2011

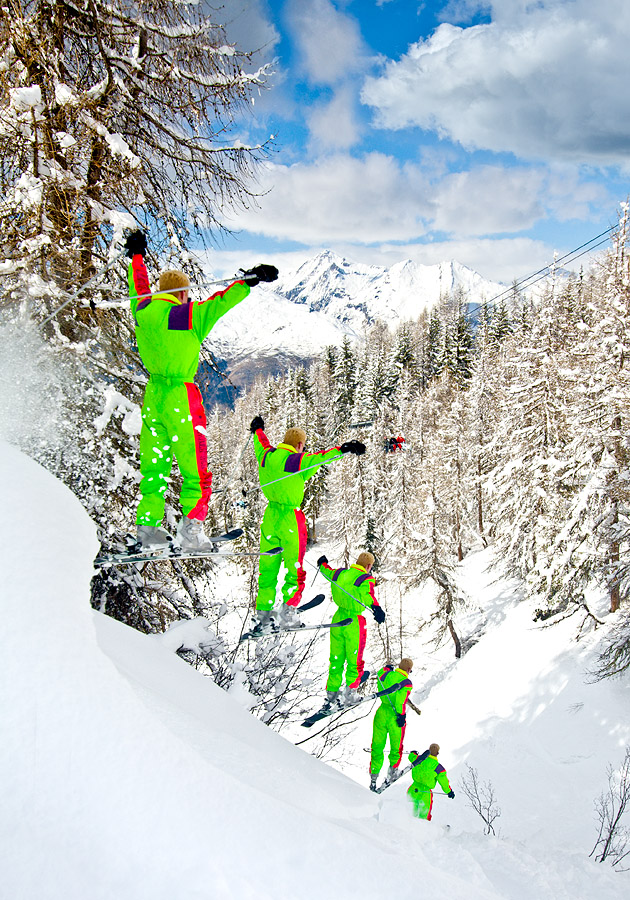
How do I combine multiple exposures for action shots?

Question

I'd like to create one of those "stacked" action shot images where multiple exposures are combined to show the subject moving across a static background. Here's an example I found on Flickr (by Laurence Asuncion): http://www.flickr.com/photos/dfunkpinoy/2755832144/

Ideally, I'd like tips both for the photography part of this and for post-processing. For example, I'd imagine I want to shoot manual w/ the same exposure for all shots (as with a panorama), but I'm not sure if there are any other helpful tips for taking the shots. At one point, for example, I thought I'd have to tripod-mount the camera and keep the same framing for all shots, but I've now seen several examples where the composition moved from shot-to-shot.

I'm also interested in recommendations for post-processing -- software, technique, etc. I can envision a manual process where I stack layers and align them by hand in Photoshop Express, but I'd be surprised if there wasn't a better way — maybe using a pano tool like Hugin.

Answer

Everything that applies to shooting a panorama applies to shooting one of these. A tripod makes assembling more convenient but means you can't pan to follow the action. It's important to rotate the camera and not move your feet in order to make sure the shots line up. Locking the focus is going to be necessary. Same with shutter/aperture.

I've only done one of these, it could have been shot on a tripod but the location didn't allow it! I loaded the images in Photoshop, auto-aligned and then manually masked the overlap areas, this was quite easy as the frames are just the right distance apart to minimise overlap. A bit of overlap adds to the effect, too much can make it hard to see what going on.

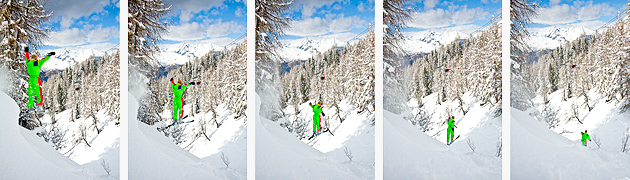
Here are the original shots:

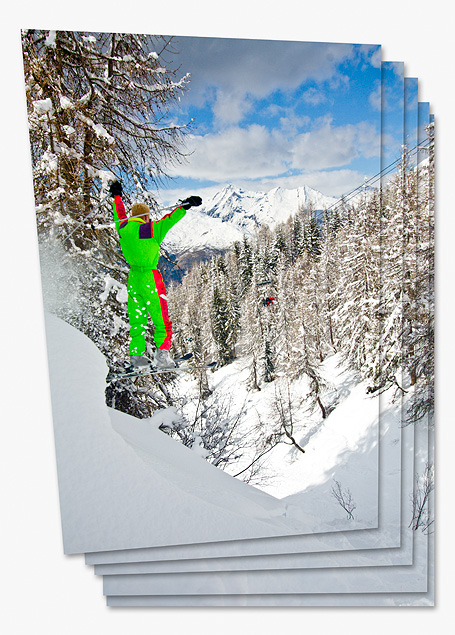
Photoshop's built in panorama tool has no trouble aligning the images:

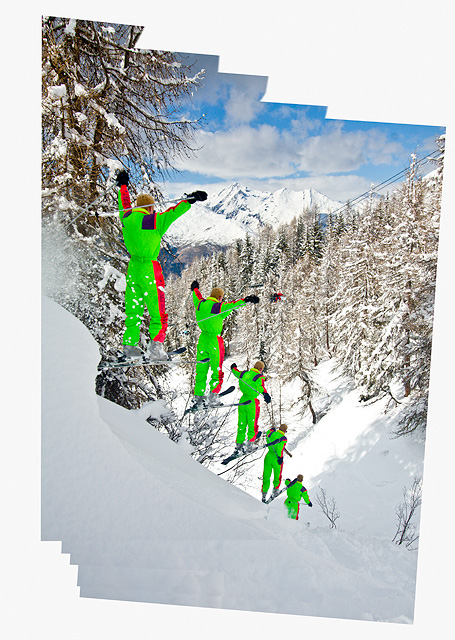
A drop shadow has been added to show where the edges are. As you can see there was a little panning. I did not shoot the images but I did the post production (and modelling :) the actual photos were taken by a friend of mine. Here are the images blended together:

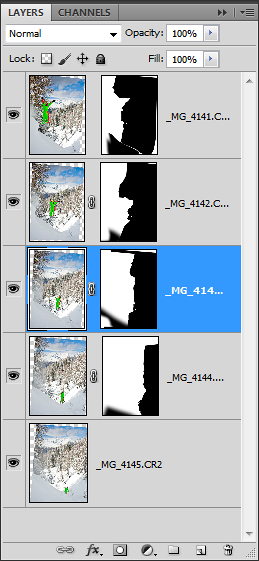
Here are the masks used:

I did a bit more blending, rotated the image, and filled in some missing sky/foreground and adjusted the contrast slightly, here is the final image:

The camera settings were 1/800s f/8.0 ISO200 22mm

I would be possible to automate the process of overlapping the subject by subtracting the common background areas and layering up the frames in chronological order.

Friday, July 15, 2011

What is “bokeh panorama” (also called the “Brenizer method”)?

Question

Somewhere I don't remember, I heard about the Brenizer method.

After reading a few sites, there is no consistent information about what it is exactly, or what the procedures are to apply it, so:

  • What is its goal?
  • Is it a merely post-processing job?
  • Can it be applied with any lens?
  • Is there a preferred scenario?

I hope you can explain it to me a little more. Thanks!

Answer

It's essentially a way of using image stitching so you can use a long lens to shoot a wide-angle image.

As with a panoramic image, you shoot a number of pictures that will eventually become one image. The idea is to use a relatively long lens, like a "portrait length" telephoto or longer, so that you can get a very shallow depth of field on your main subject. You then shoot a number of images of the subject's surroundings, keeping all of the settings -- including the focus point -- the same as the original image. This is a whole lot easier to do if everything, including focus, is manual.

Ordinarily, the primary subject is a person or a couple (Brenizer is a wedding photographer), and people move, their clothing shifts, etc. You want, then, to get a very tightly-framed picture of all (or at least most) of your main subject with the first shot. Sometimes you can cut them off at the feet and fill in the rest later, but if you're shooting people "dressed up" outdoors, the chances are that dress hems and trouser cuffs will go astray. Sometimes stitching makes up the difference, but not all of the time.

The next shots will be of the surrounding area. Make sure there's a generous amount of overlap between images, and take enough pictures to completely cover the same field of view as the wide-angle lens you are trying to simulate.

The rest is post-processing: panoramic stitching and whatever retouching you may need to do to make the image seem like it was all-of-a-piece in the first place.

When you are done, you will have created an impossible picture -- the equivalent, say, of shooting the image with a 24mm f/0.2 lens. That is, you'll get the field of view that a wide-angle lens will give you, but a razor-thin depth of field that a wide-angle lens can never give you. (Well, not any wide-angle lens that can be made with the materials and knowledge of optics that we're likely to have in the next century or so.)

The optimum for ease of shooting would be one or two people and a static environment. The more moving parts there are in the scene, the harder it gets -- people will have to hold a pose anyway, and the more people there are, the less likely it will be that everyone will hold still while they're being shot. Dogs and kids? Maybe not a good idea most of the time.

How do I create a panoramic picture?

Question

I saw a nice panoramic image online. How do i go about creating my own (say, for my house yard)?

Answer

The easiest way to produce a high quality panorama is to take multiple shots and stitch them together using AutoStitch (Windows only). AutoStitch is free and there is almost nothing to do except to chose your images and save the results.

The basic principle is to take multiple shots with overlap between them (20%-30% is recommended) while keeping everything constant (exposure, aperture, focus and white-balance).

If your camera has a Stitch or Panorama Assist mode, that is exactly what it does: It locks all the settings and shows you an overlay of the last photo you took so that you can line them up.