Showing posts with label film. Show all posts

Thursday, May 24, 2012

Can photographic composition rules be used in cinematography?

Question

We all know that photographic composition has certain rules like the rule of thirds, diagonal lines, etc. I am wondering whether those same rules can be applied in cinematography. Can they?

I discussed this with an artist in my lab and he said they can be applied. His argument was that a film is no more than a set of shots, so a rule applied to a film will have a similar influence to when it is applied to a shot.

I am kind of hesitated to accept that argument for two reasons. The first is that many of the composition rules in photography have been established based on the assumption that we have to understand the scene through that single shot. For example, aligning an object with the diagonal lines of the shot gives the feeling that the object has some movement or dynamism. But in a film, it is easy to see the movement/dynamism in any object, simply because we can see how it moves. So where does the diagonal lines rule stand in this?!

Second, because in two of the books I have about cinematography, I didn't find any of the photographic composition rules.

So again, can photographic composition rules be used in cinematography? If not, is there any suggestion on how to integrate with minor modifications?

Asked by Promather

Answer

Absolutely they can. My roommate in college was studying film, and in the classes on cinematography they taught about compositional rules such as rules of thirds, etc. The fact that the picture now has motion in it doesn't negate how we emotionally process a picture. The feeling of dynamism is enhanced when the camera is moving diagonally along a road that is also diagonal through the scene. The same as the fact that the same effect is minimized when the movement is horizontal.

Essentially, in cinematography you have a few more compositional tools available to you. There are two classes of shots:

  • Static camera with some elements moving on screen. Common example would be dialog shots.
  • Moving camera with changing perspective. Common example would be panning shots across the scene.

The static camera cases can directly apply the rules of photographic composition, which we in turn stole from the art community. If you pay attention in most of the major films, you will rarely if ever see the speaking actor's head centered in the middle of the screen.

The moving cases will provide some new compositional rules to apply, but the basics don't change. In fact the static compositional guidelines provide a good framework to plan out moving camera shots before investing the film to see if they work out.

A couple more thoughts about cinematic composition: I've seen movies where the diagonal was used for the path of actors. For example battle scenes where two armies are clashing, and you can see the line of soldiers. In other words, the action can be placed on the "power lines" that we might use in static composition. The camera is still stationary, but the movement in the scene is more grand.

Also, when you consider musicals and dance movies, that is where all the cinematic composition stops get pulled out. We've all seen the aerial shot with the dancers making patterns on the dance floor. That's using the compositional technique of repeating shapes to lend more interest applied to moving objects.

What I'm getting at is that while we photographers have to capture everything in one shot and imply the sense of motion, cinematographers are not limited by that and can actually capture motion. The rules of composition can help with the staging and planning of the scenes. It's not uncommon for directors to take input from their top cinematographers, knowing that if it doesn't look good on film people won't watch it.

Answered by Berin Loritsch

Saturday, May 12, 2012

What's the best way to develop old, exposed film?

Question

A friend of mine just found 3 rolls of exposed 135 (i.e. 35mm) film. They are at least 10 years old. He'd like to know if it is even worth taking them to the local hour photo lab but also if he should give them any special instructions.

Asked by Paul Cezanne

Answer

I don't know from experience, but I think it would be possible for the film base to deteriorate after such an extended time, and thus cause it to become more fragile. I would consider developing it by hand rather than having it run through a machine which might put undue pressure on the roll. Also - In my opinion, "trying" it is always worth it ;) You never know what you could get!

Answered by dpollitt

Sunday, May 6, 2012

Can I modify my Rolei 35 S to take digital photographs

Question

I am sure it is just a matter of time before a camera modification kit, and eventually a generic digital sensor to fit all (most) 35mm cameras is manufactured to convert film cameras into digital cameras.

I want to do this with my Rolei 35 S as it is by far my favorite camera I have used in my life.

Is this possible at this point in time? Are there any developments being made in this area?

Asked by Billy Moon

Answer

You can't at the moment, and I would suspect that you'll never be able to either.

It was proposed a few years ago but never got off the ground.

The idea was to have a flexible ccd sensor that would go across the back of the camera instead of the film and the electronics would be in the "cannister".

More information and links

It resurfaced as an April Fool's joke in 2011

Don't forget that Canon (for example) digital bodies can use older lenses so the preferred upgrade path (for the manufacturer) would be to buy a digital body and continue to use the older lenses in the short term gradually replacing the lenses as and when you could afford to.

Answered by ChrisF

Tuesday, April 17, 2012

How do I effectively photograph when the sun is in the frame?

Question

I have been trying to get a good shot out of direct sunlight but my shots just turn out dark, even if I set my shutter speed to the 1000-4000 range at ISO 200. Another odd thing is that even if my shutter speed is below the thousands range, they still turn out dark when sunlight is involved.

What settings can I use to remedy this? I am using a Canon EOS 50 film camera, and I usually use ISO 200 films. I am in Manual Mode. What shutter speed-aperture combination can you suggest. What about ISO, or even lenses?

I have no means to scan the photos, so I guess I will just describe one of them in detail:

The picture is composed such that the camera is pointed at the sunlight, and a person is at the left side of the photo. The sun has just risen, about 7 am, and a little above the horizon. The output image is dark, so is the person, but the sunlight is beaming radiantly, forming some sort of a huge ball of light, and everything that's near the camera (the person, the plants around the person) is dark, and the sky is a bit dark too.

Asked by Ygam

Answer

How are you metering the photograph? There is no one aperture/shutter-speed/iso combo for any situation, you either need to get an accurate meter reading or 'guess'. When I say 'guess' I mean use the Sunny 16 rule which is:

In daylight, the appropriate shutter speed at f16 is 1/ISO

So if your ISO is 200 and your aperture is f16 then your shutter speed is 1/200 (or 1/250), from this you can figure out any other aperture/shutter-speed combo 'guess': f11 would be 1/400, f8 would be 1/800 etc.

Given this starting point you can hold the camera up and get a meter reading to see how far off the guess is and adjust accordingly by looking at the meter in the view finder and changing your aperture/shutter-speed until it reads a good exposure. You may also want to try changing metering modes to be tighter (spot) or wider (matrix) which has a pretty good discussion going here:

Rule of thumb for metering? When best to use Multi-Zone/Matrix, Spot, or Center-Weight?

EDIT (given the OP's edit):

The problem most certainly is metering. The camera is metering for the scene which sounds like its 90% The Sun and 10% your subject, you need to meter for your subject. You can accomplish this in a variety of ways:

-You could switch to spot metering and take a meter reading off your subject first and then use that for the photograph

-You could get really close to your subject and meter their chest/face such that they fill up most of the frame for metering and then go back to your original position and use that reading.

-You could look around near you for something in a similar amount of light (the ground in front of or behind your feet) and take a reading and use that

-Get more light on your subject somehow

-etc

Answered by Shizam

Monday, April 16, 2012

How do I effectively photograph direct sunlight?

Question

I have been trying to get a good shot out of direct sunlight but my shots just turn out dark, even if I set my shutter speed to the 1000-4000 range at ISO 200. Another odd thing is that even if my shutter speed is below the thousands range, they still turn out dark when sunlight is involved.

What settings can I use to remedy this? I am using a Canon EOS 50 film camera, and I usually use ISO 200 films. I am at Manual Mode. What shutter speed-aperture combination can you suggest. ISO? or even lenses?

EDIT: with no means to scan the photos, I guess I will just describe one of them in detail.

The picture is composed such that the camera is pointed at the sunlight, and a person is at the left side of the photo. The sun has just risen, about 7 am, and a little above the horizon. The output image is dark, so is the person, but the sunlight is beaming radiantly, forming some sort of a huge ball of light, and everything that's near the camera (the person, the plants around the person) is dark, and the sky is a bit dark too.

If that did not help, I'll try to scan it :P

Asked by Ygam

Answer

How are you metering the photograph? There is no one aperture/shutter-speed/iso combo for any situation, you either need to get an accurate meter reading or 'guess'. When I say 'guess' I mean use the Sunny 16 rule which is:

In daylight, the appropriate shutter speed at f16 is 1/ISO

So if your ISO is 200 and your aperture is f16 then your shutter speed is 1/200 (or 1/250), from this you can figure out any other aperture/shutter-speed combo 'guess': f11 would be 1/400, f8 would be 1/800 etc.

Given this starting point you can hold the camera up and get a meter reading to see how far off the guess is and adjust accordingly by looking at the meter in the view finder and changing your aperture/shutter-speed until it reads a good exposure. You may also want to try changing metering modes to be tighter (spot) or wider (matrix) which has a pretty good discussion going here:

Rule of thumb for metering? When best to use Multi-Zone/Matrix, Spot, or Center-Weight?

EDIT (given the OP's edit):

The problem most certainly is metering. The camera is metering for the scene which sounds like its 90% The Sun and 10% your subject, you need to meter for your subject. You can accomplish this in a variety of ways:

-You could switch to spot metering and take a meter reading off your subject first and then use that for the photograph

-You could get really close to your subject and meter their chest/face such that they fill up most of the frame for metering and then go back to your original position and use that reading.

-You could look around near you for something in a similar amount of light (the ground in front of or behind your feet) and take a reading and use that

-Get more light on your subject somehow

-etc

Answered by Shizam

Tuesday, March 20, 2012

What's the Reason 35mm Film is As Wide As It Is?

Question

I'd like to know if there is a reason why Dickons and Edison chose exactly 35mm as the width of their films.

Asked by Max Ried

Answer

Yes, they took normal 70mm film stock used to make movies, and cut it in half. It was cheap. It was really not a big deal at the time.

Answered by Pat Farrell

Sunday, March 18, 2012

How to proceed after having developed the negatives?

Question

There are a lot of excellent questions (and answers!) about the process of developing (BW) film at home. I would like to try my hand at it, too.

But it's not exactly clear how to proceed after having developed the negatives (in the second question, @whuber says: "Then you're all ready to make a contact sheet and proceed to enlarge them...but that's a topic for another day.").

One possibility could be to scan them and then proceed as if they were raw images from a dslr. But this is obviously not the classical solution. So, how do you actually go from the developed negative to a printed photo?

As an aside, considering the scanner option (which would probably be easier for a beginner): I have read that a resolution of 300 or 600 dpi is "good enough" for some definition of enough. In particular, I would like to know if it is good enough to preserve the grain of the film (otherwise, where's the point of it?)

Asked by Francesco

Answer

Once you have the negative you use an enlarger to create your prints. An enlarger has a head containing a bulb, a negative holder and a lens. The head is on a column attached to a base. You can raise the head away from the base to make the image larger (or turn the head to project the image onto a wall for large prints)

If you want to do a contact sheet, you cut your negative into strips to match the size of your paper, and lay them on top of the photographic paper (in contact with the paper, hence "contact sheet"). You put a piece of glass over the top to keep the negatives flat and in place. You turn on the enlarger bulb to expose the paper, and then develop it with a similar mix of chemicals you used for the negatives (developer, stop bath and fixer)

Once you have your contact sheet to review, and decide to make a full sized print. You load a negative strip into the holder in the enlarger. You turn on the bulb and focus the image onto an empty easel (which holds the paper in place). Once focused, turn off the enlarger, and load the paper into the easel. Then you turn on the bulb once again to expose. Usually the enlarger is connected to a timer.

To get the correct exposure takes some trial and error. Generally you cut up strips of paper (so as not to waste entire sheets) and use these as test strips. You cover most of the strip up with your hand or a piece of cardboard. You expose for say a total of 60 seconds - every 10 seconds you uncover a bit more of the strip, so that when you are done, you have sections that have been exposed for 10, 20, 30, 40, 50 and the full 60 seconds. You can then develop and view the test strip in full light to judge what the correct exposure should be. Then you put in your 8x10 paper and expose for that amount of time.

Answered by MikeW

Wednesday, March 14, 2012

What is the difference between the Instax Mini 25 and the Cheki series?

Question

I'm seriously getting confused.

I'm Googling around for an Instax Mini 25 unit, but I keep getting conflicting results.

  • some of the results hint on a distinct difference between the Mini 25 and a Cheki (e.g. Mini 25s come in only white, while Chekis come in a variety of colors)

  • some of them show no distinction between the two, as if the two are interchangeable

So here I am. Can anybody tell me exactly what's up with this?

Answer

Instax Mini 7s and Mini 25 are also called Chekis, they are the same cameras. This article/entry on Photojojo might help to clear it up for you.

Answered by John Cavan

Sunday, March 11, 2012

Why does blue sky gets rendered as black in black and white film photos?

Question

I recently started using a film camera along with my digital camera. I took a picture with both the cameras. This one is from digital camera:

enter image description here

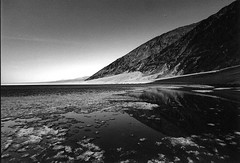
Left is the photo without editing and right after selecting "Black & White Treatment" in Lightroom. See the way sky is rendered white. This is what I was expecting from film camera without any filter. But I was pleasantly surprised to get this:

Badwater Basin

This is a scanned copy of the print I got from film. The blue sky is rendered black. I shot this on Ilford Pan F Plus at ISO 50 with sun towards the right of the frame.

Now my question is, what is it that rendered the blue sky black? Is the characteristic of this particular film or some contrast in the scene or the guy who developed this for me played some nice trick.

Asked by Vikas

Answer

Your printer appears to have done quite a bit of burning in of the sky area (and of the closer of the two rock faces, as well as some general vignetting). It's a pretty good job, but you can see some lightness close to the hill that wouldn't be there if the darkness was the film's response to the sky.

Panchromatic black-and-white film is generally more sensitive to blue than to other colours (although by how much varies with the emulsion, some being more sensitive to greens and others to reds than others). In order to get a substantial sky, you normally need to use some sort of colour filtration, normally in the light yellow to deep red range. Without filtration, a blue sky will normally be very light in tone, without much distinction between the sky and clouds.

When shooting black and white, you should consider a K2 yellow filter and a #25 "light red" (it won't look very light to you when you see it) to be standard parts of your kit. The K2 will render the sky more or less "normally"—that is, there will be a distinct tonality to the sky, lighter at the horizon and getting darker as you move up, with visible clouds. The #25 will give you a much darker sky and more dramatically contrasting clouds (assuming white clouds, of course). There are filters covering the range between the K2 and the #25, but they're sort of "neither here nor there"—they're not strong enough to really be dramatic, but are obviously filtered. To get the Ansel Adams-style black skies, you might want to use a #29 dark red filter.

You can approximate the look of filters when converting your colour digital images to black and white, but with a great deal more control over contrast than you can get with an ordinary optical filters.

Answered by Stan Rogers

Saturday, March 10, 2012

Affordable Entry Level Medium Format

Question

I would like to do some medium format work. What is a cheap but good camera to start with. I have several 120 cameras but which would be a good camera to use

Asked by RCProgramming

Answer

I would say a TLR (Twin Reflex Camera) body is probably the most affordable medium format system available.

You can find a Rolleiflex and Seagull Camera bodies for under $300 USD.

Check out the TLR tagged images from flickr.

Answered by Alan

Monday, February 20, 2012

What kind of photography is still better done with film cameras?

Question

Are there any kind of photography left today which digital cameras are still in the disadvantage to film cameras?

Asked by txwikinger

Answer

Infrared photography is much more accessible with film. With digital it is possible, but generally involves modifying the sensor to remove the infrared filter, which is very expensive.

Answered by chills42

Saturday, February 18, 2012

What is the best negative scanner (35mm) for $400 or less?

Question

Now that we are moving to the digital world...

What is the best negative scanner for the price range of up to $400

Asked by Shaihi

Answer

I'm using Nikon Coolscan V ED and I'm very happy with it. Sadly, it has been discontinued and now the only Nikon option is much more expensive Coolscan 9000 ED.

There are two Coolscans V on the eBay at the moment but I don't think I would comfortable buying a film scanner on a online auction site ...

EDIT: The biggest problem with a second hand scanner is that you don't know how much it was used. The light source in the scanner has a limited lifetime (same as the bulb in a video projector) and it's hard to tell how close to this limit it is.

If you can test the scanner you can at least see if it still works fine on dark source. (With dia film that means a dark object and with a negative film this means a bright object.) In that case I'd suggest selecting few negatives of a known quality (i.e. you had made prints from it) and running them through the scanner. That would show you the detail in bright areas. You should also check for picture noise that would indicate transport problems (i.e. a missing line in the scan or a "squashed" picture with one dimension disproportionately small) and for the noise in the scanned photo. Of course, some noise is imminent as you are working with a noise-sensitive equipment (scanner) on a source that already contains a noise from the analog recording process.

P.S. I'm not selling my Nikon ;)

Answered by gabr

Sunday, February 12, 2012

Is it better to scan negatives or prints?

Question

I've been wondering this for awhile now. Is it better to scan a 35mm negative, or a larger print from the negative? Which will provide a better scan? Does this change when moving to a larger film, like 120 or 4x5?

Answer

It is much better to scan the original slide/negative as it is always better to reproduce the image from the source, not one representation of the negative (the printed photo).

Every stage of recording introduces a level of interpretation by the process and the destination medium, which removes choice.

This is similar to digital photography, where the best source is the raw file, not a camera-developed JPEG.

Answered by Shizam

What is the reason for underexposure in my film photographs?

Question

Thanks to all the quality answers I got here that helped me to buy a film camera. I got my first roll of film processed and printed.

The print results are not as pleasing as looking at the slides through a loupe (50mm lens). One example is here. It is underexposed and has a purple tint. This is not the only one, all photos have similar characteristic.

Details and settings:

  • Camera: Nikon F100
  • Film: Velvia 50
  • Metering: Matrix

I want to know the reason for underexposed and purple tinted photos. And what should I do to avoid this.

Asked by Vikas

Answer

The purple cast is typically Velvia - learn to love it, embrace it and you'll get some stunning results. The underexposure is a compound of two things - firstly your camera is compensating and trying to make the snow appear as a mid-tone, and secondly Velvia is known for being a bit slow, many people rate it at ISO 40 or even ISO 32.

When shooting Velvia remember that you've only got 4 stops of latitude, in order to record this scene properly I'd meter the snow with a spot-meter, and then pull this up to the highlight by over-exposing that by 2 stops. You'll then get far more detail in the dark areas, and your snow will be sparkly white.

Answered by Arthur Dent

Monday, February 6, 2012

What are the dark room techniques used to manipulate the *local* contrast of a print?

Question

What dark room techniques are used to achieve effects similar to those of unsharp mask or "clarity" in digital post-processing?

Asked by dsotm

Answer

In the darkroom, one can use an unsharp mask to achieve effects similar to the digital tool of the same name. Yes, "unsharp mask" was a darkroom technique before it showed up on your computer.

You start with your negative, and copy it onto another negative (forming a "mask"). The mask is dark where the original negative was clear, and clear where the original was dark. When the mask is stacked with the original negative, the overall contrast is decreased. This allows you to print the negative+mask onto higher-contrast paper than you could without the mask. The twist is that the mask is unsharp; that is, it's a little blurry. That keeps the mask from reducing the local contrast—it just reduces the large-scale contrast. Because you're now printing on higher-contrast paper, the local contrast is increased.

Another technique for local contrast manipulation is to print on variable-contrast B&W paper, whose contrast depends on the color of light from the enlarger. You can do an overall exposure with a low-contrast filter, and then selectively expose parts of the print with a high-contrast filter.

Answered by coneslayer

Thursday, January 26, 2012

What does it mean to “mount” slide film for processing?

Question

I just finished my first roll of a 35mm slide film and it is time to get it processed. I checked few places online and the options are to get them processed "mounted" or "unmounted".

So what do these places mean by mounting a film for processing and how does it change the quality of final output?

Answer

You can have slide film processed like normal film, left in long strips, or more commonly they are individually cut into single frames and mounted in a cardboard or plastic holder, which keeps them flat, and these mounted slides can then be put in a cartridge of a slide projector. The mounts can be seen here.

The processing is exactly the same, so no difference in quality. The mounting is done after the film is processed and dried.

Friday, January 20, 2012

Is there a film scanner that can read the data from APS films and include it in the EXIF metadata?

Question

I've a bunch of APS films that I'd like to scan but all the film scanners I've seen on the market today are 35mm scanners; and whilst some have little carriers to allow you to physically scan APS, none seem to exist that read the metadata or even at the very least motor drive and automate the scanning?

Is there a product I've missed, that might be found on the likes of eBay; or would I be better off getting them scanned at my local friendly photolab?

Answer

Well, I've searched for this for a good long while. It took some real search foo, but I eventually found the terms that seem to produce a few god results: APS Film Magnetic Strip Reader.

It seems there is only one product that can be found that can read the magnetic strip on APS film that contains the EXIF metadata. Its the Nikon Coolscan IV APS Film Adapter, a discontinued product that does not seem to be available from any commercial storefront on the internet. I did a search on eBay for Nikon Coolscan, and there seem to be quite a few things, including APS specific gear. The APS Film Adapter was not listed when I did my searches, however its eBay, so you never know.

From what I can tell, the Coolscan scanners and the film adapters seem to be pretty expensive...as in, the $2000-$3000 range. Not exactly consumer-level gear. Most of the information I was able to find (which included the links from @nik, as well as several other similar sites and forums) seemed to indicate that the advanced features of APS film never really took off, and the magnetic strip that contained the metadata was never really effectively used. Seems like that is partly due to the downfall of APS as a film format (couldn't tell you why it really failed, never knew much about it.)

There was one other product that I found, the Fuji Frontier Minilab, that seems to be able to scan APS film. A lot of information seems to indicate that it can read the magnetic strip and extract the EXIF data from it, however I couldn't find anything that actually confirmed that. Sadly, it is a commercial product, rather huge, and probably far outside of any individuals price range. You might try taking your APS film to a shop that uses the Fuji Minilab, and see if their scans include the EXIF metadata. Beyond that, I couldn't find anything else relating to scanning APS film and including the EXIF in the resulting digital images.

Monday, January 16, 2012

Why is there a strange white spot on all of photos from my Zenit-B SLR?

Question

I've taken some photos with my old Zenit-B camera. And I have some strange white spot on all of the photos in the upper right corner. Sometimes it is not too recognizable, but it is everywhere.

spot on a normal photo spot on a dark photo sometimes it is not recognizable

It looks like condensate, but I can't see anything like that on the lenses when I open camera. Also it is quite strange that this spot even appeared on absolutely dark photo.

Does anybody know what could it be and how could it be fixed?

Answer

I would say light leakage and possibly internal reflections of some sort.

Considering you get a "bright patch" in the top right, I would highly suspect there is light leaking in.

The "dots" look a lot like reflections to me. In the lens, on a piece - anything that is shiny and reflects light.

I'd say start by checking whether the back closes properly. Next check if you have light leakage from the viewfinder.

Lastly, have a good look if you can see a reason for reflections in the camera.

If none of the three turn up something, try a different lens and see if the issue still occurs. If no, then it is the lens, otherwise... I'm out of ideas...

A last common option for failure would be the shutter, BUT that tends to look rather different.

Tuesday, January 3, 2012

How important is lack of color matrix metering and 100% viewfinder in Nikon F100 compared to Nikon F5?

Question

I'm planning to buy a film camera. I'm undecided between Nikon F100 and Nikon F5. The major differences that I could figure out from Thom Hogan's review are:

Pro F100:

  • F100 is lighter than the monster F5

Pro F5:

  • F5 has color matrix metering, compared to F100's matrix metering, which according to him is immaculate.
  • F5 has a 100% viewfinder compared to F100's 96%.

Being a DSLR shooter, I'm not able to figure out how important a good color matrix meter would be. On my DSLR I'm mostly on spot meter, but then I've the luxury of reviewing the image on live view and making any necessary adjustments. Also, my DSLR has a 92% viewfinder, but again I've the luxury to crop digital images.

How important are these factors in a film camera?

Answer

A 100% viewfinder is really a pro feature on film cameras -- it can actually cause problems if you are shooting for mounted slides or having your film processed at a consumer lab, since part of the image is going to be lost under the slide mount or to slight cropping in automated printers. If you compose to the edges of a 100% finder, you are going to lose something somewhere; the "consumer" viewfinder will at least make sure that you're getting it all in. Cropping still happens; it's just not under your control. If you're shooting for film scans (common for everybody these days, but once upon a time something that only pros shooting for print would do), or printing to the frame edge (which is going to have a bit of a grungy roughness) then the 100% finder makes a lot more sense and can be worth the extra cost.

Colour matrix metering means that the camera can recognize things like skin tones and make allowances for them. If the metering is grey-scale only, then the meter is only looking for grey-scale values; the matrix computer won't be able to say "ooh, this looks like a tight head shot, and that big pinkish blob in the middle is probably meant to be a stop or so above middle grey". If you're letting the camera do most of the work, then the ability of the camera to distinguish colours make a lot of difference. If you're spot metering and placing tones (doing the roll-film version of the Zone System), then it won't make any difference -- the success of the metering job depends on your ability to expose for the tones. (If you're shooting anything that's colour-critical, incident light metering, either with a light meter or with a grey card and your camera's meter, is often the better choice anyway. You can take advantage of the film's latitude and printing/processing to bring the highlights and shadows back into line, but getting the critical stuff bang-on works best in camera, and you don't want to be guessing at subject reflectance.)

So it all comes down to what you're shooting and what happens after the shot. If you're shooting in a journalistic style and need the camera to be a full partner in the exposure so that you can get that never-to-be-repeated shot, then colour matrix metering can help (a slight caveat, though: it doesn't work nearly as well in a world of darker-skinned people as it does with East Asian and European complexions and scene recognition is never perfect -- you need to know enough to perform a quick sanity check on what the camera is telling you). And if you're processing the finished image yourself or scanning it for print, then the ability to compose to the edge in a 100% viewfinder will make a small difference in the sharpness and grain of the final image -- but if you're not, then you may lose elements of the image that were important to the composition.

Monday, January 2, 2012

Are old reels of film useful past their “Use By” date?

Question

I have about seven ISO 400 reels of 36 shots each, all of which have a use-by date of sometime in 2006.

Are they useless now and should I just throw them away?

Or, does the Use By date not matter and it would not make a difference if I used these reels to take pictures?

Answer

Absolutely. In some cases, people do this for the effect that is achieved. Flickr, for example, has a group dedicated to images from expired film. Some of the outcome is really quite nice, but it is obviously going to be hit or miss since the nature of degradation is unpredictable.

Also, film expiration is not absolute. It largely depends on storage conditions because the number there is basically a guideline for film that is on a store shelf at room temperature. If you've been storing it refridgerated, or better yet frozen, then it may well be perfectly fine. Basically, unless it's really old or kept in a high temperature or humid environment, it should be fine. And, if it isn't, then see my first paragraph and enjoy it anyways. :)