Showing posts with label tips. Show all posts

Friday, April 20, 2012

Projector friendly pictures?

Question

I am a member of a photography club. Each time we meet to critique, the pictures are projected on to a wall. Most of the folks complain that the picture quality is quite bad when projected. Unfortunately, switching projectors or finding a large screen is not an option.

What are some tips on taking pictures that look good both when projected and on a monitor?

Asked by publicRavi

Answer

Projector native resolution needs to be taken into account. This will often be no higher than about 1024 x 768 in cheaper or older projectors. If you drive it at higher resolutions or at different aspect ratios it may convert internally but you are at the mercy of its processes.

A very major and often overlooked factor in using a projector is that what you see when the projector is turned off IS black, when the projector is turned on. The projector cannot "make" darkness - it can only add light to the starting black level. So, turn off the projector. That's black. If that is not black enough you need to do something about it.

  • Minimum to zero light level is one thing.

  • A screen should be used - a coloured wall changes your "black". The "screen" can be a roll of white paper (carefully rolled up afterwards or a cloth, preferably tensioned to make it ripple free.

I have found that ambient light reduction makes a stunning difference to otherwise poor results.

Answered by Russell McMahon

Saturday, March 24, 2012

How to shoot water spilled on the floor?

Question

I am planning a scene with water spilled on a floor or desk. The floor and desks have designs which will be distracting for my shot.
I am thinking of placing a paper sheet as a back drop.

Which colour of the paper will suit most for showing up the water on the paper?

The lights which I have are shade table lamp with yellow light, an emergency light with white tubelights, candles, and a white tubelight on the wall.

How much should be the minimum or maximum shooting distance for the spilled water to show up?

Asked by Anisha Kaul

Answer

I think you need to try a few things and see what works for you as ultimately it seems to boil down artistic choice. What is the picture that you’ve got in your head that you want to try to produce?

Some colours may work better (my guess would be lighter colours), however I suspect any colour could be made to work. If you have a dark, non-reflective surface, then positioning your lights may create reflections in the water / help to instil it with a presence. With lighter colours you may be able to create a similar effect by adding some colour to one or more of your lights (blue tissue paper / gels for example)...

Having an object as part of the composition (possibly the source of the spill) may also give opportunities for showing reflections in the water to give it more presence.

Different types of paper are going to have a different effect on the water. Tissue paper is very absorbent, crate paper can have a matt finish, wrapping paper can be more water resistant but is often shiny. Having a slight pattern in the paper may help to emphasize the presence of the water if you can get it to distort the pattern. You may find that you can get a better balance between colour/reflection/absorbency by opting for card rather than paper.

As for how close, again it’s very subjective. If you zoom in all the way in the centre of the spill you may not be able to tell that it’s there. However from the same distance if you zoom out there’s a good chance you will... If your focus were the edge of the spill however you may be able to tell at both ends of the zoom... Your angle to the spill is going to impact how much water the light goes through between the camera and the surface which is going to change how visible the water appears.

It sounds like a fun project, but really I think you need to experiment a bit, try a few different options and see what is closest to the picture you’ve got in your head.

As it's water week, I did a bit of experimenting and for me, I thought darker colours with a bit of a reflective tint seemed to work the best.

This one's some water in a teflon pan. It caught the light well and showed an obvious water edge. Water in Pan

I shot another pan, which was much lighter with a matt finish and the water is far less obvious: Wataer in light pan

I quite lighted the effect of water on foil (the less shiny side) Water on foil

But largely, I think it's more the angle that you shoot the water at that makes the edge of the 'spill' more obvious. Water on paper

Answered by forsvarir

Thursday, January 26, 2012

Recommended photography magazines

Question

What are some internationally available magazines on photography that you would recommend to a photographer who's mastered the basics and is interested in widening his horizons, in terms of inspiration and technique?
Personally, I'm looking for something that does not focus on post-production or aquiring expensive gear.

Answer

I agree w/Staale, and to add to that, avoid any magazine that devotes an inordinate amount of space to gear reviews and advertising... well maybe keep one gear one around cuz they're fun to read :) But for mags that I actually derive inspiration:

  • photo technique: great photography, great tutorials and very informative in both inspiration and actual technique
  • Aperture: More of an 'inspiration' entry, its all photographs and artist's discussion on what they're doing and why
  • B&W: Similar to Aperture but focusing solely on B&W

Tuesday, January 10, 2012

Is getting the starburst sun shine like this photo is in post processing or at capturing?

Question

I cant believe that the following photograph is without any post processing?

enter image description here

Is that starburst sun shine in the photograph is an outcome of post processing or it is the result of a trick at capture time??

if so how to get an image like that?

Answer

It can be done in post-processing, of course, but that's the result of shooting a bright light source using a very small aperture (high f-number) and having a 9-bladed iris in the lens.

Different iris shapes will show different "star" patterns. This one has 18 points, which means it came from either a 9-bladed or 18-bladed iris, and since nobody makes lenses with an 18-bladed aperture iris at the moment, it must be a 9-bladed iris. You can practice creating the effect by shooting a small light bulb or candle flame against a dark background to find out which of your lenses gives the best effect and how to control the star pattern with your aperture setting.

Friday, January 6, 2012

What tips and advice do you have for photographing the Aurora Borealis?

Question

A friend has been kind enough to lend me a DSLR for a few months. It's my first foray into DSLR photography, or indeed any kind of photography beyond simply aiming my Canon IXUS at something and clicking the button.

Over the last few weeks, I've been busy studying, practising and trying to learn as much as possible ahead of a planned trip to Norway where I hope to see, and get some photos of, the Aurora Borealis.

I currently have:

  • Canon Rebel Xsi (450D)
  • Canon 50mm f/1.4 L
  • Canon 18-55m kit lens
  • Aluminium full height tripod with ball head
  • Cable release
  • Spare battery & memory cards

I'm prepared to spend the night wrapped up outdoors, in the hope that they will make an appearance. I'd like some advice on how to get the most out of this kit for the trip:

  • How should I go about setting up to get pics of the Aurora?

  • How might I achieve optimum focus?

  • From what I've read, I'll need to use the tripod and cable release, with IS turned off, on continuous shooting mode with long exposure times. But I'd like some more specific tips in terms of which aperture and ISO settings might work best?

  • Should I use one of the lenses above, or would it be worthwhile renting a better, wide angle lens; if so, which would you recommend?

Answer

I've never attempted to photograph the Aurora Borealis myself however the following advice applies to most celestial photography:

You will want the fastest (biggest aperture) lens you can get your hands on. The 50 f/1.4 is ideal, though the focal length is quite long for this sort of thing. It's good because it will let in about 5-6 times as much light as the kit lens! Fast wide lenses are a rarity for crop camera bodies such as the 450D. If you need to go wide you might get away with a Sigma 20 f/1.8, the other alternatives are not cheap: the Canon 16-35 f/2.8L would be better than your kit lens, but I'd personally go for the 24 f/1.4L even though it's not as wide.

  • In terms of focussing, for the lights themselves you'll probably want the lens set to infinity (i.e. as far as the focus ring will go) or occasionally just short of infinity. Given that the lights are very far away (i.e. the upper atmosphere) your depth of field at this focussing distance will be huge. If you want to get some foreground in for scale / composition, then obviously you need to set focus for that distance from what I can tell the Aurora are kind of fuzzy anyway to it wont matter too much if you have to focus closer. AF probably wont work in that sort of light so you focus by trial and error or maybe use live view to focus.

  • Shutter speed is a compromise between letting more light in to minimise noise, and avoiding motion in the images. I don't know how fast the Aurora move but this will probably limit your shutter speed. Noise can also increase with shutter time due to the sensor heating up however this might not be a problem where you're going! Multiple short exposures are generally better than one long one.

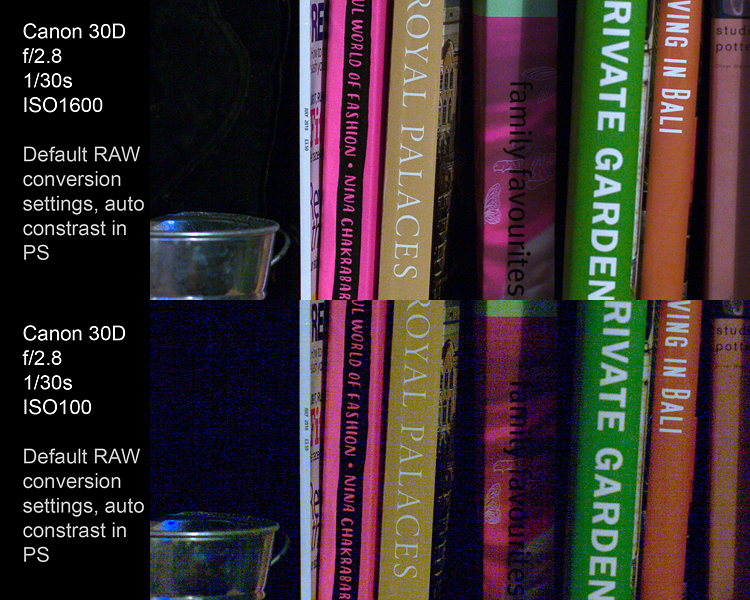
  • To reduce noise you need to get as much light down the lens as possible, and then set the ISO as high as possible (without overexposing). This sounds counter intuitive so I'll explain a bit more. High ISOs don't cause noise and actually exist to reduce noise. Noise comes from the sensor electronics, but also from the random nature of light itself. So it's not high ISOs that cause noise, it's low levels of light. The confusion originates from the fact that using a high ISO in auto mode will allow a faster shutter speed and result in more noise, however the noise is a result of a fast shutter letting in less light. If you're already letting in as much light as possible, then lowering the ISO will reduce the amplification on the sensor, and when the values are read out they will be lower and thus the readout noise will be higher in proportion. When you correct the exposure in post you amplify this readout noise. When you use a high ISO, the analogue signal is amplified before readout occurs so you don't end up amplifying the readout noise. If you still need convincing, check out this example of an underexposed ISO100 is far noisier than a correctly exposed ISO1600 shot. For the settings used, increasing the ISO, even to 1600, decreased the noise: http://www.mattgrum.com/ISOcomparison/ISO_100_vs_ISO_1600.jpg

Generally when working at night stacking is the way to go. This means shooting many shorter exposures and then combining them on your PC to produce a single image. There are many pieces of software that will do this for you, Deep Sky Stacker is one of the best. The software is designed to cope with the movement of the stars, it may be able to cope with the aurora moving as well, or you might get some ghosting.

Other things to bear in mind are that cold dramatically reduces battery life, so keep one battery in an inside pocket close to your body and swap them often. This probably wont affect you but if you're shooting exposures around 1/2s you should use the mirror lockup function to avoid the mirror slap causing vibrations which can show up in the image.

I would also recommend searching flickr for photos of the Aurora, most of the images will have the EXIF information still attached so you can see what camera settings / lenses other people are using.

Good luck!

What can be unusual POVs/angles for capturing the speaker and/or the crowds?

Question

What can be unusual POVs/angles for capturing the speaker and/or the crowds?

Assumptions:
The speakers are on a high (2 feet) platform.
The fence (see through) is around 12 feet away from the dais.
The people are around 10000 in front of the platform only.
Time is around 10:00 AM.
The photographer can't climb a tree/ladder/wall
The photographer is in the middle of the crowd
The photographer cannot go on/near the dais

?

Answer

I can think of two basic approaches:

  1. identifying a scene isolated, maybe for a single moment, from the rest of the crowd: think of the "riot kissers" from Vancouver
  2. giving a sense of completeness, all the crowd seen together, all the heads closely packed, with a lot of details and a lot of action going on.

From these basic approaches could come the choices to be made (a wide angle will be needed to give a picture of the whole crowd, a tele zoom will help to isolate a single face, gesture, pose, interesting moment). More than the rule of thirds I would care about balancing the crowd in the context of the square/place of reunion: you don't want to fill your frame with the sky losing details of all the people around you.

And, but this goes without saying, it is very important to avoid to get in danger!

ps: if you can't climb a tree, which is not necessarily easy while having the photo gear with oneself, you could always go upstairs, if there are buildings open to the public, no?

Monday, November 28, 2011

What advantages does manual mode have over aperture priority mode?

Question

I'm wondering what are the most compelling reasons to switch to manual mode on my DSLR. I mostly just use aperture priority mode so I have good control over the depth of field combined with an awareness of the shutter speed that goes with it. My photography is mostly done wandering about with camera in hand, or occasionally on a tripod. I don't do studio photography and I just use the natural light.

I did learn how to take photos manually (with an Olympus OM-1) so I know how to do it, but I enjoy the extra convenience of aperture mode, particularly being able to take the photo quickly and capturing the moment rather than fiddling with dials and missing the shot.

So what would be some key advantages of using manual mode for my sort of photography that are worth the (small amount of) extra hassle involved?

And do you have any tips to minimise the downside (other than practicing to be quick)?

Answer

I typically use aperture priority as well, but I also work a fair bit in manual mode. The typical case for me is if I am in an environment where the lighting situation is quite static, but the subject may have a lot of contrast. Here I switch to manual mode and shoot a few test frames to pinpoint the exposure (typically I try to spot meter on a white surface, and then overexpose that reading by 1.5-2 steps as a first guess).

The main advantage is that you are in full control, and the camera will not be "fooled" by unexpected contrasts in the frame. The downside is that it is a bit slower to change exposure in case the lighting situation changes.

Sunday, October 2, 2011

How to get started with fashion photography?

Question

So, I'm in a pickle, on a whim I decided to email a model who lives in Bloomington, IN. Told her how I admired her work and how I would like to take some photos of her in the spring at the Indianapolis museum of Art and sent the email on it's way. I didn't expect her to email me back, alas she did. So now I who knows nothing about fashion photography in any shape form or function must figure out how to this sort of thing before some point to be determined in the spring.

So, any tips for someone who knows a lot about landscape and flower photography but nothing about fashion photography? Oh and any books you could recommend would be stellar as well. Thanks.

Answer

The practical answer to your question is to find some female friend to photograph in that same location first, perhaps reading some tips online about photographing models.

Then you can see what works with lights, what poses look good, and practice asking for poses.

Also when you go out with the "real" model it would probably be good to take the same female friend along to make the model feel more comfortable, also they could hold reflectors or side strobes for you.

Basically you have the responsibility to try and produce some good photos for the model, it's great you are trying to get a good idea of what you should be doing but nothing beats practicing with a live person.

Monday, July 25, 2011

What are the best practices for taking pictures of a canvas ?

Question

Please share your experience about:

  • Lighting
  • Objectives
  • Setup
  • Colorimetry
  • Photo-Editing
  • ...

Answer

There is a good book which indeed does talk about photographing a canvas. It is the first book I would recommend someone who wants to learn about lighting. It is called Light: Science and Magic. (At this point: Anyone wants to have the previous edition of it? I think I'll get the new one. ;) )

The thing about the canvas is (I guess you have noticed so far already) that you've got tons of direct reflections, destroying all colour on the image. That's how this can look (I used spray paint in this example):

Polarizers parallel

Now what you can do is put the light source to your right/left/whatever (just not directly behind you), so that the directly reflected light (angle of incidence) does not hit your camera's lens but the wall next to you. This only works though when the paint is flat, oil for example might fail.

The trick I used below (and which is also described in Fuqua’s book) is a polarizer. In fact, two polarizers. One on the camera and one on the flash (which is a SB-900 — on camera). The polarizer on the flash must either be a linear polarizer (you can buy linear polarizer film) or a circular polarizer mounted the same way as if you would put it on the lens (front face facing the canvas). Then turn the polarizer on the lens until it is perpendicular to the one on the flash. How do you do that? Find a mirror, trigger the flash, and turn the polarizer, until you hardly see the flash anymore.

Then, without touching the polarizer (take care with lenses that rotate when focussing) (btw, is «rotate» the right word here?), take a pic of your canvas. This is the result in my example:

Polarizers vertical

The physics behind is really hard (if someone understands it, please tell), yet basically what happens is that the linearly polarized light from the flash does not change its polarization when reflected directly (and not changing its colour), but does change the polarization (randomly) when passing the paint layer, getting colourized, and leaving the paint again, passing the polarizer on the lens.

Ah, and regarding colour. The above images are directly out-of-cam. DO use a grey card. Some polarizers tend to introduce a colour cast. My images taken at 5500 K (Camera setting) and flash are white. With polarizers, they are blue. You will notice that in the mirror, when searching for the correct angle, at the correct point the flash will look dark deep blue, as here (I love autofocus):

Crossed polarizers

If not, then you are lucky and use very high-quality filters. In this case, please send me some :)

Regarding the rest — Try to use a tripod, makes life a lot easier. Close the aperture to where it is sharpest (see lenstip.com e.g.). If you shoot at full flash power, use a remote control since the flash duration rises upto 1/200 s and more. Use a longer focal length to keep distortion to a minimum.

By the way, you will notice the two tiny dots on the right of the image. These are magnets. I drilled holes above my door, put magnets in there, put some tape over the hole, and attach the paper with other magnets. Not the very best way since you see the magnets, but very convenient, and freaky :P

Have fun Simon

Tuesday, July 19, 2011

What “Top Tips” should I give compact camera users in a short talk?

Question

I am putting together a short talk which I'm going to give to some non-photographers.

I'm going to talk about things they can do with their compact cameras to make their images nicer. I have a bunch of ideas / tips to pass on to them, but I need to cut out most of them (it's a short talk - 20 minutes or so).

What are your top tips for "normal" people who own a compact camera (or even just a phone)?

Also, any tips for talking to these guys? Any pitfalls you've encountered?

Answer

Unless it's a specific event "for compact/phone camera users only", don't stress the equipment part that much - that's not what photography is about, and some normal people have dSLRs too.

Since you have a short talk, choose 3 to 5 ideas and cover them with examples rather than dash through as many tips as you can. You can't fit a whole beginner's course in that time-frame anyway. I'd choose something from

  • composition (placement, clutter in background, using perspective)
  • lighting (golden hour, avoiding ugly shadows, using light to lead attention)
  • post processing (choosing "keepers", fixing horizon, cropping)

Tell your tips, show samples (random snapshot vs. same shot using your tips) and only later tell them the samples were taken with just a compact/phone camera. Name the ideas shortly again in summary speech and there's a good chance some of them will stick with some listeners.

Wednesday, July 13, 2011

What sort of color correction and effects are used in this photo?

Question

I've seen plenty of photos like this before and I've always liked them. They're usually warmer colours and they seem to have a bit of a haze to them.

Photo by: David Guenther Photo by David Guenther

What sort of post production is being done to this photo? I'm mostly interested in the colour and haze effect. Is the vibrance turned down in these photos? It's seems to be yellow+ and magenta+? Does the photo have to be initially taken in a certain way, or can this sort of post processing be achieved on most photos? Do you know of any tutorials out there that explain this processing?

Answer

Using @John Cavan's suggestion of graduated fog filter and @Jerry Coffin's suggestion about how the dark layers are bright with no detail I had some key things to work with when experimenting (as @Matt Grum suggested).

I took one of my recent photos that would be somewhat similar to this picture and did the following:

Made the image warmer: Increased the yellow and magenta levels slightly
Decreased the vibrance: In Photoshop I added a Vibrance adjustment layer and decreased the vibrancy of the image
Increased the offset: In Photoshop I added an Exposure adjustment layer and increased the offset of the image
Graduated the offset effect: I masked the Exposure layer with a basic gradient making the effect stronger at the top right of the image

The key to this style seems to be the last step. The Offset. It gives the hazy low contrast look.

Attached is a before and after of the steps described above. The first image was already warmed up.

Photo by: Vian Esterhuizen