Showing posts with label night-shooting. Show all posts

Thursday, May 24, 2012

How to manually focus Nikon d5100 at very low light conditions?

Question

Suppose I have to short in very low light so I have to set up shoter speed to 10-20 sec. Live view and autofocus doesn't work in this case and view finder give you a little help since it is to dark. The only thing I know for sure is distance to object, but I'm not sure how to rotate focus ring to focus on specific distance.

So there are actually two questions: 1. How to accurately focus in low light? I.e. you can't see sharpness in View finder. 2. How to accurately focus in almost zero light?

Asked by yura

Answer

Your best option is to light the subject temporarily somehow, than use auto-focus and focus lock (or better, switch to manual focus), remove the light and take the picture.

If you can't get enough light for auto focus to work but you still get get some light on the subject than use manual focus with live view (zoom in your live view to the maximum zoom to help with focusing).

Next best option is to use the lens distance scale if it has it - just stop down a bit to increase depth of field because those scales can be a bit inaccurate (also your subject distance is probably also inaccurate because if you can just walk up to the subject with a tape measure you can also walk to the subject with a flashlight and use auto-focus)

If you can't get any light on the subject and don't have a lens with a distance scale than your next option is to focus on something else that is approximately the same distance - this tends to be very inaccurate - so stop down to increase depth of field and use a depth of field calculator to make sure you have a wide margin of error (there are DOF calculator apps for all smartphones, or you can print a DOF table from an on-line calculator if you don't have a smartphone).

And finally, if everything else fail you can use the hyperfocal distance - when you focus to the hyperfocal distance (or behind it) everything from half the focus distance all the way to infinity is in focus, any DOF calculator will tell you the distance for a given focal length and aperture

If you use the hyperfocal distance, apart from giving up on blurring the background, you will also probably have to stop down because the smaller your aperture the closer the hyperfocal distance - and if your hyperfocal distance is smaller than your subject distance you have enough margin of error to get this right in the dark using approximate distances.

Also, you want to focus a bit farther than the hyperfocal distance because if you accidentally focus even a bit nearer not everything to infinity will be in focus and you can get an out of focus subject.

Answered by Nir

Friday, April 27, 2012

How can I find infinity focus on a kit lens with no markers?

Question

I have a kit lens which has no markers. What would be a recommended way to find infinity focus on this lens?

I plan to shoot objects at night -- not necessarily stars or the moon. So, adjusting the focus using the viewfinder may not be an option.

Asked by publicRavi

Answer

I'd go to the aperture you want, go to live view, zoom in, and manually focus on the moon. For all practical purposes, it should be infinite. Mark it on the lens.

Answered by rfusca

Tuesday, March 27, 2012

How do I eliminate reflection on glass?

Question

When I take a picture through a window, I often see a reflection on the glass. I have noticed that this occurs mostly when it is dark or overcast outside or it is especially bright on my side of the glass. How can I stop this?

Asked by J. Walker

Answer

This question has been asked in many guises, ultimately you want to prevent light from inside the room reflecting off the glass and going down the lens.

This can be done by moving the lights, so the direct reflection misses the camera, or more preferably (especially if it's a well lit room and you have light bouncing off everything in many directions) blocking the light.

You can block the light with your body, or get the camera so close to the glass that there is no way for the light to get in.

Answered by Matt Grum

Saturday, January 28, 2012

What settings should I use to photograph aurora borealis with a WIDE ANGLE F4 lens?

Question

I've tried my first night photography of the stars last week. Most articles I've seen were recommending a fast lens, fully opened, @ ISO 800 and about 20 - 30s exposure, etc. Unfortunately, my only "fast" lens is a 50mm f1.4 which was fine but not as wide as I would have liked.

There is a strong possibility of aurora borealis tonight and I would like to use my wide angle lens (Canon EF 17-40mm f/4.0 L USM) With maximum possible aperture of f4, what settings should I use to produce reasonably noise free photo. I would like to omit star trailing if possible.

I will be using Canon 60D

Answer

I could make an educated guess..

Consider this picture, its EXIF data says exposed for 5 sec @ f2.8 at ISO 1600, ignoring the focal length of 14mm. and considering that you said most articles recommend shooting @ ISO 800 using max aperture (in your case f4) you should set your exposure for 20 seconds.
@ISO 400, shutter speed needs to be 40sec
@ISO 200, shutter speed needs to be 80sec
@ISO 100, shutter speed needs to be 160 seconds
but longer shutter speed might cause star trails.
Then again you can set the ISO to 3200 to reduce the shutter speed to 5 seconds.

Assuming the brightness of the Aurora Borealis is the same as in this picture.

I also suggest turning on the custom fuction on the 60D for high ISO noise reduction and Long Exposure noise reduction.

Friday, January 6, 2012

What tips and advice do you have for photographing the Aurora Borealis?

Question

A friend has been kind enough to lend me a DSLR for a few months. It's my first foray into DSLR photography, or indeed any kind of photography beyond simply aiming my Canon IXUS at something and clicking the button.

Over the last few weeks, I've been busy studying, practising and trying to learn as much as possible ahead of a planned trip to Norway where I hope to see, and get some photos of, the Aurora Borealis.

I currently have:

  • Canon Rebel Xsi (450D)
  • Canon 50mm f/1.4 L
  • Canon 18-55m kit lens
  • Aluminium full height tripod with ball head
  • Cable release
  • Spare battery & memory cards

I'm prepared to spend the night wrapped up outdoors, in the hope that they will make an appearance. I'd like some advice on how to get the most out of this kit for the trip:

  • How should I go about setting up to get pics of the Aurora?

  • How might I achieve optimum focus?

  • From what I've read, I'll need to use the tripod and cable release, with IS turned off, on continuous shooting mode with long exposure times. But I'd like some more specific tips in terms of which aperture and ISO settings might work best?

  • Should I use one of the lenses above, or would it be worthwhile renting a better, wide angle lens; if so, which would you recommend?

Answer

I've never attempted to photograph the Aurora Borealis myself however the following advice applies to most celestial photography:

You will want the fastest (biggest aperture) lens you can get your hands on. The 50 f/1.4 is ideal, though the focal length is quite long for this sort of thing. It's good because it will let in about 5-6 times as much light as the kit lens! Fast wide lenses are a rarity for crop camera bodies such as the 450D. If you need to go wide you might get away with a Sigma 20 f/1.8, the other alternatives are not cheap: the Canon 16-35 f/2.8L would be better than your kit lens, but I'd personally go for the 24 f/1.4L even though it's not as wide.

  • In terms of focussing, for the lights themselves you'll probably want the lens set to infinity (i.e. as far as the focus ring will go) or occasionally just short of infinity. Given that the lights are very far away (i.e. the upper atmosphere) your depth of field at this focussing distance will be huge. If you want to get some foreground in for scale / composition, then obviously you need to set focus for that distance from what I can tell the Aurora are kind of fuzzy anyway to it wont matter too much if you have to focus closer. AF probably wont work in that sort of light so you focus by trial and error or maybe use live view to focus.

  • Shutter speed is a compromise between letting more light in to minimise noise, and avoiding motion in the images. I don't know how fast the Aurora move but this will probably limit your shutter speed. Noise can also increase with shutter time due to the sensor heating up however this might not be a problem where you're going! Multiple short exposures are generally better than one long one.

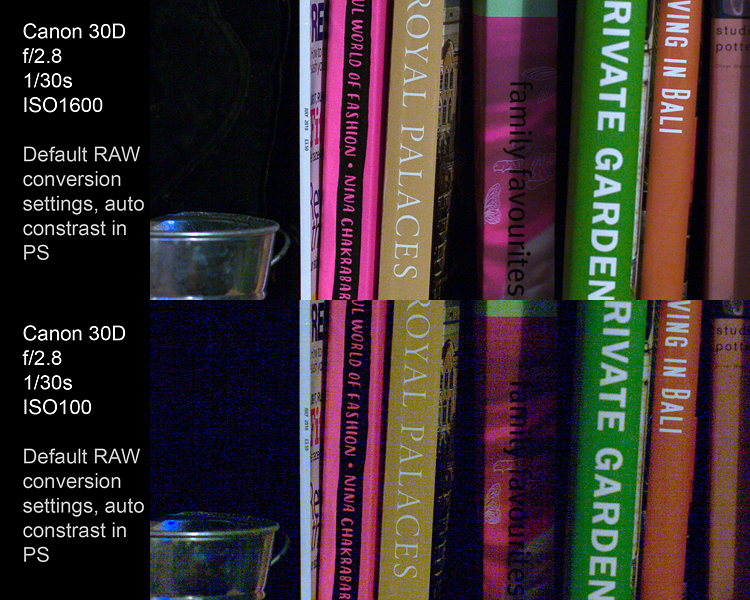
  • To reduce noise you need to get as much light down the lens as possible, and then set the ISO as high as possible (without overexposing). This sounds counter intuitive so I'll explain a bit more. High ISOs don't cause noise and actually exist to reduce noise. Noise comes from the sensor electronics, but also from the random nature of light itself. So it's not high ISOs that cause noise, it's low levels of light. The confusion originates from the fact that using a high ISO in auto mode will allow a faster shutter speed and result in more noise, however the noise is a result of a fast shutter letting in less light. If you're already letting in as much light as possible, then lowering the ISO will reduce the amplification on the sensor, and when the values are read out they will be lower and thus the readout noise will be higher in proportion. When you correct the exposure in post you amplify this readout noise. When you use a high ISO, the analogue signal is amplified before readout occurs so you don't end up amplifying the readout noise. If you still need convincing, check out this example of an underexposed ISO100 is far noisier than a correctly exposed ISO1600 shot. For the settings used, increasing the ISO, even to 1600, decreased the noise: http://www.mattgrum.com/ISOcomparison/ISO_100_vs_ISO_1600.jpg

Generally when working at night stacking is the way to go. This means shooting many shorter exposures and then combining them on your PC to produce a single image. There are many pieces of software that will do this for you, Deep Sky Stacker is one of the best. The software is designed to cope with the movement of the stars, it may be able to cope with the aurora moving as well, or you might get some ghosting.

Other things to bear in mind are that cold dramatically reduces battery life, so keep one battery in an inside pocket close to your body and swap them often. This probably wont affect you but if you're shooting exposures around 1/2s you should use the mirror lockup function to avoid the mirror slap causing vibrations which can show up in the image.

I would also recommend searching flickr for photos of the Aurora, most of the images will have the EXIF information still attached so you can see what camera settings / lenses other people are using.

Good luck!

Monday, December 26, 2011

Can I combine two photos to get a good image of a non-full moon?

Question

Is there a good combo of longer exposure and shorter exposure that I can use to get two photos of the moon that I can then combine to show the sun-lit side and the earth-lit side together so I have one disk?

What software post production will I have to do to reduce the glare on the earth lit side that comes from the sunlit side etc?

(I am using Aperture 3 and a Nikon D90.)

Answer

First, I recommend you take a look at my answer to another question about photographing the moon here:

Best Settings for Nighttime Moon Photos

As for your specific question, it would probably be fairly difficult to get two shots that you could merge together without a tracking mount. As such, my first recommendation is to either buy an equatorial tracking mount, or if you have a friend who has one, see if you can borrow it. With a tracking mount, you should be able to get the necessary exposures at low ISO without any blur from the motion of the moon, which should result in a decent combination.

If you do not have access to a tracking mount, the best I can say is use the chart from my other answer linked above, and try to keep your exposure times as minimal as possible. A camera with very good high-ISO performance will make it easier to get a shot of earthglow with a short exposure, without losing too much detail. You might want to use ISO 3200 if you have it. Noise is a real moon detail killer, since your signal-to-noise ratio is pretty low to start with. Using higher ISO's and keeping exposure time faster than 1/15th of a second should do it, but you will experience some problems with noise.

Wednesday, December 14, 2011

How can I maintain camera stability without a tripod?

Question

I was shooting some photos last night and I was having trouble not blurring the images. The issue I know comes from me shaking while the shutter is open. A tripod would have been the perfect fix but I did not have a tripod on me at the time.

Are there any techniques, tips, or tricks that I can try to help maintain stability when shooting in low-light conditions without a tripod?

(This question applies to both point-and-shoot and DSLR cameras.)

Answer

Some "tricks"

  • Ninja breathing, as above. Learn to hold breath at critical moment.

  • Body braced in as stable a position as you can get it. "Think like a rock" :-) ie elbows in against body, head pulled down against body, "hunched" posture feet placed consciously firmly and maybe slightly spread.

  • Brace against something !!! - Lamp post railing, corner of building, nearest person (introduce yourself first). Maybe crouch with knee on ground.

    • Place camera on or against something and attempt to lock it rigidly - pull down against surface so it doesn't move. You may need to place arock, pen, stick under part of base to allow you to lock it in right orientation. This is more for the "10 second Hong Kong skyline at night with no tripod shots" than slow shutter.
  • Use the 2 second timer if present. When bracing etc the action of moving your hand to press the shutter button can either result in post shot tremor with shutter open or painfully locked with finger in mid air. and less stability than you would have had. A 2 second shutter delay lets you push the button and then concentrate on turning you and the camera into a rock for 2 seconds.

  • String/cord/rope under boot and pull up to get taut cord.
    Cord from 2 points even better.
    Cord from 3 points and pulled to tension approaches a tripod in stability.

  • Monopod.

Tuesday, December 13, 2011

How do you make a shot look like it was taken at night?

Question

Okay, so I was watching a movie recently, and there was a night scene. The whole valley could be seen in light, and there were some stars as well, and the actors could be seen, but it just looked like it was night. How do you make a shot look like it was taken at night, especially if there is no signs of civilization around?

Answer

The effect is called day-for-night and it's particularly common in old movies.

It's often not very convincing.

Often the best looking effects can come from artificial lighting.

  • It's often characterized by a blueish hue - this can be achieved by white balance - and by underexposure. Boosting the contrast may help too.

  • Sometimes, day-for-night involves very powerful lighting setups where the lights "overpower" the sun and can provide local highlights. This can be quite effective if done well.

  • It's often better just to actually shoot at night, or at dusk/dawn, and use lots of side/edge lighting.

  • Post-processing can be useful in dampening the bright sky (though it's often best to just avoid including any sky) and removing highlights from clouds, etc which are dead giveaways.

Monday, December 12, 2011

How to capture detail of craters on the moon?

Question

How can I photograph the moon so that I see detail of the craters and mountains?

I have a Canon EOS 550D (T2i) and tried "No Flash", "P" as well as creative auto mode, but to no avail. Every time I get a completely white moon.

Moon Shot

Answer

I had exactly the same problem when I first tried to photograph the moon: all I ever got was an overexposed white circle.

The answer is that the moon is much brighter than you realise. Also, unless you have a very telescopic lens, it's going to be pretty small in your photo. If you use one of the camera's automatic modes, the camera will try to get the "right" exposure for a scene made up of lots of black sky and a tiny bit of moon. The "lots of black sky" wins out, the camera brightens the exposure, and you lose the detail in the moon.

The best way to capture the moon is therefore to use Manual mode. This isn't as difficult as it sounds:

  1. Switch the mode dial to M.
  2. Set the ISO setting to something quite low: between 100 and 400 should do it.
  3. Set your aperture setting to somewhere round f/5.6.
  4. Set your shutter speed to around 1/100s.

Now try a shot and see how it looks. If it's too bright, keep reducing the shutter speed until you start to see the detail of the craters. If you've somehow under-exposed it, just do the opposite: try a slower shutter speed, a smaller aperture or a lower ISO setting.

The main thing is ignore what the camera is telling you! It'll be flashing away like crazy saying your shot is going to be too dark, but just ignore it. We know the sky will be "too dark", but it's the moon we're after. Fold away your targeting computer, Luke. Use the Force.

Good luck!

Wednesday, November 30, 2011

What is the best setup for shooting sports at night with a point & shoot camera?

Question

I always try to take good photographs in soccer matches or in races at night, not using flash, and I have always the same result: too much blurred photos.

I don't have an SLR, but I'm sure that's not the problem; the problem is the setup.

What I have to do?

My camera is a Panasonic Lumix FZ18.

Thanks!

Answer

Actually, shooting with a compact camera rather than an SLR is part of the problem. Basically, shooting a game at night means that you don't have enough light for decent exposure times. As a consequence, your exposures are long and the moving objects are burred. The field's lighting are rarely enough to allow you to capture moving subjects with ISO low enough so noise is not a problem. In this case, the options are to:

  1. Add lighting (e.g., use a flash - but in your specific case there are 2 problems: your camera does not support an external hot-shoe flash, which may be solved by an optical slave, and more seriously, typical compact flashes just don't have enough power to light a soccer field effectively but it may be just fine for a race track if you can get close to the action).

  2. Use a lens with large maximum aperture (small F-number). Your camera offers F2.8 which is not bad for this purpose, but in the SLR world you have lenses with bigger apertures.

  3. Use a camera with more sensitive sensor. P&S cameras typically have far smaller sensors compared to SLR's. In the digital world, the bigger the sensor - the better its light recording ability. Pro sports shooters use full-frame, or at least APS-C bodies for the advantage in high-ISO low noise images they have over P&S cameras. You can dial up the ISO in your camera but the images will become very noisy/grainy vary fast. Also note that your camera is pretty old (2007 model?) which means that even for this form factor, you can expect better ISO performance from newer technology.

So, as you see, SLR camera will certainly help you to achieve better images in these tough conditions.

On top of all - remember to always use a tripod there and a remote release if possible. Even if the players and the ball end up somewhat blurred, at least the field and the background will remain sharp.

Monday, November 28, 2011

What settings do I need to take a night cityscape with blue sky like Eric Rolph?

Question

I was wowed when I looked at this image on google maps for the Prudential Tower observatory. Then I start digging into the photographer (Eric Rolph -flickr) and I found he had some stunning pics beside this.

What do I need to take a picture like this? Stand, long exposure, how much if yes? Can I achive something similar with my Nikon D5100?

Eric Rolph - For The Shortening of Our Life

For reference: this photo was taken with Canon EOS 5D.

Answer

You can very well take night shots like this with D5100. I'll explain from my experience when i took this pic.

Chicago Lights

Time

Timing is very important in city-light shots. You can see the deep-blue/purple color of sky in the example picture you posted. You get this color a bit after sunset (Twilight). Unlike other landscape shots, you need a clear sky. So plan your trip to the observatory accordingly.

Lens

A wide angle lens is the most suitable for city-light shots. Apart from getting a wide viewing angle you also get a good depth of field.

Aperture

What you need is a large depth of field. Setting it more than f/8 on a wide angle lens gives you good depth of field. Few city-light shots look particularly good if you go all the way to f/22. You get star burst from light. But this depends on your lens.

Shutter speed

I exposed my light meter off the blue sky. It gave me some 10s of shutter speed. Generally it is a good idea to meter off the blue sky.

Tripod

You definitely need a tripod or a solid support for your camera. Exposure time is going to be much more than you can hand hold the camera.

Other consideration

  1. Observatories have big glass windows. And at night they start reflecting room lighting. Be ready to post-process them out.
  2. Shoot raw. You might want to change WB later.
  3. Use lens hood.

About the actual image

  1. Looks like the photographer has set a cooler WB on the image. I reduced WB of my image to get this look:

    enter image description here

  2. The EXIF data of image shows it is shot at 1/30th of second. To compensate this faster shutter speed aperture is increased to f/2.8 and ISO bumped up to 1250. The reason of using a fast shutter speed is not very clear to me. It could be because tripods might not be allowed (?) in John Hancock observatory, Boston.

Sunday, November 27, 2011

What settings do I need to take a night cityscape like this?

Question

I was wowed when I looked at this image on google maps for the Prudential Tower observatory. Then I start digging into the photographer (Eric Rolph -flickr) and I found he had some stunning pics beside this.

What do I need to take a picture like this? Stand, long exposure, how much if yes? Can I achive something similar with my Nikon D5100?

enter image description here

For reference this photo was taken with Canon EOS 5D

Answer

You can very well take night shots like this with D5100. I'll explain from my experience when i took this pic.

Chicago Lights

Time

Timing is very important in city-light shots. You can see the deep-blue/purple color of sky in the example picture you posted. You get this color a bit after sunset (Twilight). Unlike other landscape shots, you need a clear sky. So plan your trip to the observatory accordingly.

Lens

A wide angle lens is the most suitable for city-light shots. Apart from getting a wide viewing angle you also get a good depth of field.

Aperture

What you need is a large depth of field. Setting it more than f/8 on a wide angle lens gives you good depth of field. Few city-light shots look particularly good if you go all the way to f/22. You get star burst from light. But this depends on your lens.

Shutter speed

I exposed my light meter off the blue sky. It gave me some 10s of shutter speed. Generally it is a good idea to meter off the blue sky.

Tripod

You definitely need a tripod or a solid support for your camera. Exposure time is going to be much more than you can hand hold the camera.

Other consideration

  1. Observatories have big glass windows. And at night they start reflecting room lighting. Be ready to post-process them out.
  2. Shoot raw. You might want to change WB later.
  3. Use lens hood.

Monday, October 10, 2011

How do I choose between an SLR or an expensive P&S?

Question

I am planning to buy a new camera and am all confused. I am an amateur photographer who likes to click good photographs. I try to make the most of my Nikon CoolPix camera and have some decent understanding of what and how to click. Photography seems to be an upcoming hobby for me in recent past.

Below are some of my chief requirements :

  1. The camera should be able to take good pictures indoors. Mostly I will be clicking Indoors.
  2. The Camera should be able to click quickly. This is a must. This requirement comes as I will be mostly photographing my one-year-old daughter. Children are not steady — they don’t wait for your camera to stabilize the image. In the best case, the camera should be able to easily capture moving objects; I think it is like a "sports mode" or should have a high FPS. I am hoping that I can use the sports mode when it is difficult to make my daughter to pose.
  3. It should have a good zoom. Many a times, it is not possible to reach places which you want to photograph; for example, a bird sitting on top of a building.

I am now confused about which camera to buy: an SLR or an expensive Point-and-Shoot?. With the help of friends I have been able to shortlist the below two cameras:

  • Nikon D5100 priced at $676 at Amazon. A default lens of 18-55mm.
  • Sony HX 100 At $450 at Amazon. 30× Zoom

I am worried that if I buy an SLR, I will have to buy an expensive zoom lens as well. At 676 USD, the D5100 is already on the more expensive side for me. Also, in my experience, a 5× zoom looks trivial to me and I feel that a 10-15× zoom is generally needed. The Nikon 5100 comes with a 18-55mm lens which probably gives 3× Zoom. To my surprise, experienced photographers that I know said that you will not need much Zoom?! Also, I am told that a 30× zoom that the Sony P&S has will not be of much use without a tripod.

The Sony HX seems to have a good sports mode at a good 10 FPS. On the contrary, the SLR has a much lower 2-6 FPS, which means that I will not be able to capture moving objects. Again, my friends tell me that a 2-6 FPS that a SLR gives is very good.

Can you please suggest which camera will meet my requirements more? Is an Expensive Point & Shoot as good as a DSLR? Is Point-and-Shoot better for zoom and high FPS ?

I am also unsure why zoom is generally not given with SLRs, even though it is possible to calculate it.

And, finally, which camera will give better HD Video ?

Answer

Since you say "Photography seems to be an upcoming hobby for me in recent past", I think you should get a system camera of some sort. That means a camera with interchangeable lenses and other dedicated accessories (like hotshoe flash options). Usually, that means an SLR, but there's a relatively new class of mirrorless interchangeable lens digital cameras like the Micro 4/3rds system from Olympus and Panasonic or the NEX from Sony that you may also want to look into.

In this, you are giving up some of the convenience based flexibility of an all-in-one package with a superzoom lens in exchange for customizable flexibility where you can build a set of equipment for your needs.

Because you are trying to cover a lot of things, from low-light to extreme telephoto, any all-in-one package is going to suffer from a lot of compromise. The image quality of that 30× zoom lens is impressive for what it is, but not that great in an absolute sense. The same comes from the tiny sensor used, which enables the high telephoto numbers. (See this for the technical reason why a small sensor helps here; as you can see, it's really just like cropping.)

I've covered some of my reasoning in Are there disadvantages to a prosumer camera for a beginner, aside from cost?, and I'll try not to repeat myself too much.

You can get a lot from a point & shoot camera, although I'd steer you to one of the lower zoom high-end models which tend to focus more on image quality and low light rather than emphasizing the zoom range as a priority. Compromise has to happen somewhere, and for taking kid pictures, I think that's the right direction. That would be something like the Canon Powershot G12 or S95, Olympus XZ-1, or Fujifilm X10 (not to be confused with the X100, which is also very exciting but more of a commitment to a certain approach to photography).

If you go for an SLR, you'll have to put more work into clicking good photographs — but you'll also be able to get a much bigger return on that work in terms of results. You won't have the gigantic zoom range, so you'll probably have to move around more, and/or change lenses in the middle of things. Without spending for a camera body priced at about twice what you're aiming for, you won't get the raw FPS, so you'll have to learn to time your shots rather than counting on "pray and spray". If you had just said "I want to take good pictures and not think about it", I wouldn't advise this direction — but if you're really interested in photography as a hobby and in making great pictures, it'll be worth the investment.

You'll certainly end up putting in more money into a system camera, whether SLR or mirrorless. I think $1500-$3000 is a reasonable budget to start with for the first couple years, although you can be more frugal if you're careful. You don't necessarily need to spend that all in one go, but it sounds like you want to do a lot of things. You'll probably immediately benefit from at least a nice normal prime lens and a basic hotshoe flash. As you note, the 18-55mm kit lens doesn't cover a huge zoom range, and it's also not very fast. Given your desire for more telephoto reach, you'll probably want to add a telephoto zoom and a solid tripod. Each of these things, in their entry-level versions, runs about $200 — and you may decide you want to move up from entry level.

If you decide that frames-per-second are really vital, you may want to consider if you can stretch from the Nikon D7000, which offers 6fps (and comes with an 18-105mm kit lens, which offers more convenience but again is an exercise in compromise). Or you could look at the comparable Pentax K-5, at 7fps. I know this is stretching your budget (especially with a new baby — I've been there!), but you may decide it's worthwhile after all. Life is short, and your child won't ever be a baby again: start getting those great photographs as soon as possible. In support of this position, I'll leave you with one of my favorite camera-recommendation articles. It's tongue-in-cheek (there is no real "George") but is also serious: The Online Photographer: Letter to George.

Wednesday, August 24, 2011

How do I shoot massive bonfire in order to produce an HDR image?

Question

I am looking for advice on how to shoot a massive bonfire to produce an HDR image. My school has a massive bonfire every year for homecoming — it is 30+ ft. tall. I have been shooting and HDRing my photos for a year now and have gotten decent results during daytime shooting, but I have never really taken an HDR shot at night.

I have a tripod so I am not worried about getting an image; I am more concerned with the best way to get the series of images for an HDR'd image. Should I take one RAW and manipulate it into five JPEGs during post, or shoot five shots that night? Also, I would like to get as crisp an image as possible of the flames. Are crisp flames a pipe dream?

Just in case this helps: I will be shooting with a Sony a33, which is pretty good in low light, and either a 50mm/f1.8 or a 28mm/f2.8. All mounted on a tripod.

The fire is pretty bright during the initial burn, so that should help cut down my exposure time.

What tips do you have for me?

Answer

Pulling out multiple JPEGs from a single RAW file always results in lower quality HDRs than the one done with bracketed RAWs. Specially the dark parts of your image will show noticeable noise. On the other hand, bracketed shots require static scene which isn't the case for you but I believe is the right thing to do. If I were you I'd shoot as much bracketed shots as possible and try playing around to get the best outcome. Flame shots at night typically ends up requiring 1/30-1/40 (considering you already have some fast enough lenses) shutters which will not stop the action to a full stop but wont be bad either.

Worst case, when merged, resulting HDR will show some crowd movements and a dreamy flame, which isn't bad either, in fact it will add some interest in the photo ;)

Tuesday, July 12, 2011

Why are red lights in night / city scenes coming out as big red blobs?

Question

I've noticed that in a lot of my night shots of cityscapes, red lights (e.g. neon signs on buildings, etc.) tend to come out as big red blobs:

Not very good example of big blobby red lights

The above was taken with my Canon 500D.

What can I do to reduce this? (Either as I'm taking the photo, or as a post-processing step.)

Answer

What you're seeing in that shot is overexposure. Unlike overexposure in a day time shot,where the blown highlights tend to go pure white, the red light from the sign caused overexposure in the just the red channel. Thus all the different tones of red have become 100% red and detail is lost.

It can be fixed by reshooting at a faster speed / smaller aperture pulling up the shadows, or blending multiple exposures (using HDR techniques).

Did you shoot raw? If so you may be able to fix it without reshooting, by taking advantage of the extra headroom in raw to reduce the exposure. If you have Adobe Camera Raw there is a tool called "recovery" which attempts to fix this kind of blown highlights though it doesn't always work that well.